![Custom directives with express-graphql [ Part-1 ]](https://cdn.hashnode.com/res/hashnode/image/upload/v1627561575475/49p4Yq4lf.jpeg?w=1600&h=840&fit=crop&crop=entropy&auto=compress,format&format=webp)
Custom directives with express-graphql [ Part-1 ]
Implementing custom directives in graphql using express-graphql and graphql-directive


Starting points
The project is divided in 3 parts. If you already have a project setup and would like to only see how custom directives can be implemented using express-graphql, jump to part 3 which can be found below:
📍 Final code: Link
🌐 Live preview: Link
The first 2 parts are just building blocks where the whole project setup is done. I initially thought to directly show how to implement custom-directives but then I realized it would be much better if I create a sample project along with it as it depicts the use-case in a much better and understandable way. To be honest, first 2 parts are not going to be much fun since these parts only involve testing and getting the base of the project completed . I will try to get these done as fast as I can.
👉 Note that I am making use of graphql-directive because I think it is a light-weight tool that works really well with express-graphql . There are other tools such as graphql-tool that can also be used to write custom-directives but personally I prefer to pair graphql-tools with apollo-server. Its just my preference.
Also note , In all of these parts I will not spend any time on the frontend since this posts mostly deal with the backend part. I will create a frontend in part 3 but will breeze through that part rather quickly.
The app that we are working on is kind of like instagram ( i call it photos! ). The functionality of the app includes the following:
- Create posts
- Each post can be liked
- Each posts can be commented upon
- Only admin can create posts
- Admin has all permissions
- There will be a Moderator assigned by admin that can moderate posts and comments on each post
- Unauthenticated users can only view posts
- Authenticated users can view , like and comment on posts created by admins. Note only admins can create posts! If you want to give normal users the ability to create posts, you can do that also. But I have not added that functionality.
- Only Admin can view the users list and has the ability to update roles of any single user
to any of the following roles:
- ADMIN
- MODERATOR
- AUTHENTICATED_USER
In total we will use 3 custom directives. 2 to check if user is authenticated as well as authorised.
- @isAuthenticated
- @hasAuthorisation(role: Role)
- @upperCase This simple custom directive will just convert headings to uppercase when queried from frontend.
@hasAuthorisation also implements the functionality of @isAuthenticated but adds a check to see if correct user is authorized for the request!
Initialising the server
I used typescript for this project, but pure javascript can also be used as per your convenience. The dependencies to be used are as follows:
core dependencies
    "@types/jsonwebtoken": "^8.5.2",
    "bcrypt": "^5.0.1",
    "cors": "^2.8.5",
    "express": "^4.17.1",
    "express-graphql": "^0.12.0",
    "graphql": "14.6.0",
    "graphql-directive": "^0.2.1",
    "jsonwebtoken": "^8.5.1",
    "mongoose": "^5.12.14"
devDependencies
   "@types/bcrypt": "^5.0.0",
    "@types/cors": "^2.8.10",
    "@types/express": "^4.17.12",
    "@types/mongoose": "^5.11.97",
    "@types/node": "^15.12.4",
    "dotenv": "^10.0.0",
    "nodemon": "^2.0.7",
    "rimraf": "^3.0.2",
    "typescript": "^4.3.4"
👉 Please note the version number for 'graphql' package and to specifically use 14.6.0, as I was having a couple of problems with newer version of 'graphql' package.
yarn init
yarn add
The basic folder structure for the whole project will be as follows:
server
-dist
-node_modules
-src
--graphql
---directives
---resolvers
---schemas
--models
-index.ts
-.env
-package.json
-tsconfig.json
yarn.lock
Folder structure breakdown
- dist-- folder contains the compiled javascript files generated by tsc compiler.
- node_modules-- contains the source files related to the dependencies that we installed earlier.
- src-- is the primary folder where our code will reside.
- graphql-- folder consists of schemas, resolvers and directive-resolver that will be used a bit later on.
- models-- folder consists of schema for our mongodb database.
- index.ts-- is the starting file for our server. Everything will be initialised from here.
The structure might not be clear right now but will get clearer later on. Also initially we will be using only one schema file for defining out graphql queries and mutations. Later on we will divide the schema into seperate files (schema splitting).
Lets install the dependencies for now.
Running the project for the first time
For running the project, there are two main commands:
yarn start
// or
npm start
The command above executes tsc --watch which internally spins up the typescript compiler. You should see the dist folder being generated as specified in tsconfig.json The next command is
yarn dev
// or
npm run dev
This run nodemon dist/index.js and keeps the server running and tracks all the changes on the go.
👉 Please note that I am using 2 seperate terminals to run the above commands i.e npm run dev & npm run start .
  "scripts": {
    "start": "tsc --watch",
    "compile": "tsc && node dist/index.js",
    "dev": "nodemon dist/index.js",
    "dev:tsc": "tsc --watch --preserveWatchOutput",
    "build": "rimraf ./dist && tsc -p .",
    "clean": "rimraf ./dist"
  },
If you want to run both in the same terminal, do the following changes to your scripts property in package.json and then in terminal to start the project, just do npm run dev
 "scripts": {
    "start": "tsc --watch",
    "compile": "tsc && node dist/index.js",
    "dev": "nodemon --watch src/ --exec \"npm run compile\" --verbose -e ts",
    "build": "rimraf ./dist && tsc -p .",
    "clean": "rimraf ./dist"
  },
Connecting to monogdb and adding mongoose schema
The index.ts file in src directory after adding connecting to mongodb will look something like this:
import * as dotenv from "dotenv"
dotenv.config()
import express, { Express } from "express"
import mongoose from "mongoose"
const app: Express = express()

const PORT =
  process.env.NODE_ENV === "production"
    ? process.env.PORT
    : process.env.PORT_DEV

const MONGO_URI = process.env.MONGO_URI as string

mongoose
  .connect(MONGO_URI, { useNewUrlParser: true, useUnifiedTopology: true })
  .then(() => {
    console.log("connected to mongodb...")
    app.listen(PORT, () => {
      console.log(`server started on port ${PORT}`)
    })
  })
  .catch(err => {
    console.log(err)
  })
Adding environment variables
The environment variables file will look something like this. While moving to production, you can simply update these here and code will update automagically!
NODE_ENV="developement"
PORT_DEV=4000
MONGO_URI="mongodb+srv://test:<password>@cluster0.kzxvi.mongodb.net/myFirstDatabase?retryWrites=true&w=majority"
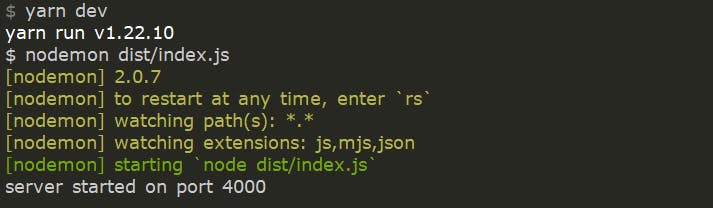
After starting the project, the output will look something like this:
for yarn dev
for yarn start

📌 The code till now can be found here: Link
Adding mongoose schema
After connecting to database. Now it's time for creating mongoose models that will represent how our data will be saved in database. For this I will create the models folder inside src directory and create 4 models:
- User
- Post
- Like
- Comment
In each of these 4 folders, I added 2 files: [Model].ts & index.ts
This would look something like this:
-src
--models
---User
----User.ts
----index.ts
---Post
----Post.ts
----index.ts
---Like
----Like.ts
----index.ts
---Comment
----Comment.ts
----index.ts
The code for these files is as shown below:
/* User.ts */
import { Schema, model } from "mongoose"

export enum Role {
  ADMIN = "ADMIN",
  MODERATOR = "MODERATOR",
  AUTH_USER = "AUTH_USER",
}

interface UserSchemaType {
  username: string
  email: string
  password: string
  role: string
}

const userSchema = new Schema<UserSchemaType>({
  username: {
    type: String,
    required: true,
    unique: true,
  },
  email: {
    type: String,
    required: true,
    unique: true,
  },
  password: {
    type: String,
    requried: true,
    min: [6, "password must be greater or equal to 6 characters"],
  },
  role: {
    type: String,
    default: Role.AUTH_USER,
  },
})

export default model("User", userSchema)
/* Post.ts */
import { Schema, model } from "mongoose"

interface PostType {
  image: string
  title: string
  description: string
  creatorId: string
}

const postSchema = new Schema<PostType>({
  image: {
    type: String,
    required: false,
  },
  title: {
    type: String,
    required: true,
  },
  description: {
    type: String,
    required: false,
  },
  creatorId: {
    type: Schema.Types.ObjectId,
    ref: "User",
  },
})

export default model("Post", postSchema)
/* Comment.ts */
import { Schema, model } from "mongoose"

interface CommentType {
  text: string
  postId: string
  creatorId: string
}

const commentSchema = new Schema({
  text: {
    type: String,
    required: true,
  },
  postId: {
    type: Schema.Types.ObjectId,
    ref: "Post",
  },
  creatorId: {
    type: Schema.Types.ObjectId,
    ref: "User",
  },
})

export default model("Comment", commentSchema)
/* Like.ts */
import { Schema, model } from "mongoose"

interface LikeType {
  postId: string
  creatorId: string
}

const LikeSchema = new Schema<LikeType>({
  postId: {
    type: Schema.Types.ObjectId,
    ref: "Post",
  },
  creatorId: {
    type: Schema.Types.ObjectId,
    ref: "User",
  },
})

export default model("Like", LikeSchema)
📌 The code till now can be found here: Link
👉 Note: In the final code repository there is a client-redux folder which also consists of frontend with client graphql implementation using redux. Although , it is important to note that, functionalities such live as refetching of queries , implementaion of custom fetch and error policies is not implemented in this project.
📍 Final code: Link
🌐 Live preview: Link
In the next part we will configure graphql and instantiate the graphql schema along with its resolvers. Part-2 ->